Fairy's magic smoke,
Contained in this meager box,
Chaos potential
tldr; If you enjoy putting sketchy components with explosion-potential inside of a sketchier DIY box and wiring everything through questionable boards bought for cheap off Aliexpress, then this is the intro blog post for you!
My last startup gig focused on the autonomous dismantling and testing of EOL electric vehicle batteries for potential re-use as second-life storage batteries. The idea was that batteries from old electric vehicles unsuitable for the road are probably still quite good for storage applications, so there should be a business case for repurposing those batteries instead of just disposing them or going through the costly process of recycling them. It wasn't a crazy revolutionary idea: Posh Robotics (now Posh Energy) was a YC startup that pitched that idea a year or so before us, Redwood Materials demonstrated a second-life BESS at their recycling plant many years ago, BigBattery in nearby Chatsworth had been running a seemingly profitable business on this concept for years, and B2U had been (and maybe still are) shoving old Nissan Leaf packs into storage containers for grid storage. Unfortunately, the startup died before we could get to building second-life batteries from salvaged cells (we had focused on autonomous dismantling and testing), but as part of our liquidation process, I ended up with a bunch of sketchy EV battery modules and cells in my house, so I (very slowly) built some off-grid power banks out of them.
A Warning on Battery Safety
I'd like to caution any reader who would want to attempt similar projects to read as much about battery safety as possible, especially if you intend to deal with high-voltage and high-current applications. At the very least, refer to ElectroBOOM's lovely video on electricity hazards. I think we take for granted how typical electronic devices are certified/tested to ensure that they don't blow up in our faces, and while I'm not saying that every battery cell you touch could end up being one of those hoverboard lipo fire disasters, the increased power density from these cells isn't something to take lightly. Shout-out to my former office ops manager K and my former battery engineer R for yelling at me to stay safe whenever I started poking battery packs and agreeing to hit me with a wooden stick if they ever saw me convulsing when touching a battery.
Here were some (better safe than sorry) practices I followed whenever I handled EV cells/modules:
- Wore rubber/electrician's gloves rated for >3000V whenever possible, especially during initial pack disassembly when I didn't know the state of the battery
- Tried to do anything I could one-handed so that in the worst case scenario, I hopefully wouldn't have the current run through my heart
- Taped over any terminals/busbars if I wasn't working on them
- Kept all loose fasteners in containers away from the modules/cells after removal
- Made sure to only cut cables when disconnected, and if not, only cut a single wire at a time to avoid shorts through the cutters
- Kept pack ventilated and near an open door for both quick ejections (if the pack was small) and quick escapes (if the pack was too big)
- Put a fire blanket over the battery pack when we weren't working on it
- Checked for any bulging cells and leaks at earliest opportunity
Second-life Battery Components
There are quite a few kits ([1][2]) already on the market and forums ([1][2]) to build second-life powerwalls or packs, mostly for off-grid or backup applications. I was not ambitious or brave enough to try for a powerwall-scale project, so I mostly spec'ed out handheld and suitcase-sized power banks with inverters that one may take camping or a construction/work site. The most basic set of components are pretty straightforward:
- salvaged cells/modules
- storage container or box for the pack [1][2]
- high-current busbars and connectors for the output (sometimes salvaged with the cells/modules)
- connectors and wires to cell level so that pack can be properly balanced (sometimes salvaged with the cells/modules)
- inverter matching the voltage range of the target pack [1][2][3]
- BMS matching the cell count and voltage range of the target pack [1][2][3]
- high-current power switch
- battery capacity gauge (usually just approximating capacity from voltage) [1][2]
- connector for charging port (I just used a standard barrel connector)
- ACDC charger for the target power bank voltage
- power cables matching the max expected current draw
Some nice-to-haves:
- zip-ties and zip-tie mounts with double-sided table to help with cable management
- kapton tape to isolate terminals and also help with cable management
- independent busbar blocks to help with final power output
- battery lugs for high current output
- screw terminals and crimps for early testing/validation
- anti-reverse diodes for (safer?) charging
I also ended up getting a hydraulic crimper to help with connecting/splicing the thicker gauge power cables. The internet as a whole seems mostly in agreement that crimping is more secure than soldering thick cable connections, especially if your home soldering setup is power-limited (as most likely are for these gauge wires) and would risk cold solder joints.
My Junk Powerbank Attempts
NiMH Packs
NiMH cells from old Toyota Prius hybrids were a really interesting use-case to start testing. From my time at the startup, these appeared to be the most readily available cells available on the salvage and reuse market. A lot of small mom-and-pop garages (at least in the LA area) where offering hybrid pack repair and replacement services for the Toyota Prius, and I bought many of our test packs from flip-flop wearing mechanics off of Facebook Marketplace.
The older NiMH chemistry for these cells (as opposed to NMC in most other EV packs) made battery management a bit difficult and limited pack configurations. Apparently it's not advised to use these cells in parallel configurations [1][2] due to how the cells behave as they approach full charge. Slow-charging is always recommended, and it looked like a proper charger should be measuring the pack temperature for safety purposes as it reaches full charge. The only cost-effective NiMH chargers I found were a set of USB-C boards from Eletechsup (resold through Aliexpress), and I could only use the 6S or 12S options due to the module design in the Prius (you don't have access to individual NiMH cells). I have no clue if these charging boards are safe or not, but I can attest that no cells bulged or expanded during the course of my random machinations.
Mechanically, the cells needed to be clamped. Despite their appearance (and really, the appearance of most EV cells), these are pouch cells (as opposed to cylindrical or prismatic), so they're prone to swelling if overcharged and not mechanically constrained. This setup is more common for second-life power banks that use Nissan Leaf cells, but I also used 2 aluminum plates and some threaded rod with locknuts to group the cells into a block. For busbars, I could re-use the default copper plates in the original pack.
For a typical module with 6 cells (nominal 7.2V) and 6.5Ah capacity, you basically get the performance of the battery to an average power drill. In one test pack, I 3D-printed some ends to cover the terminals and also house the charger board and some buck converters to use as an oversized phone power bank. In another test pack, I added a small 12V car inverter, but that tended to trigger an over-voltage alarm when the cells were fully-charged (12S NiMH gives 14.4V nominal but up to max 16.8V-ish). While I started with a 7-module pack configuration (50.4V nominal), I quickly abandoned that due to my lack of comfort and understanding with NiMH charging requirements as mentioned above.
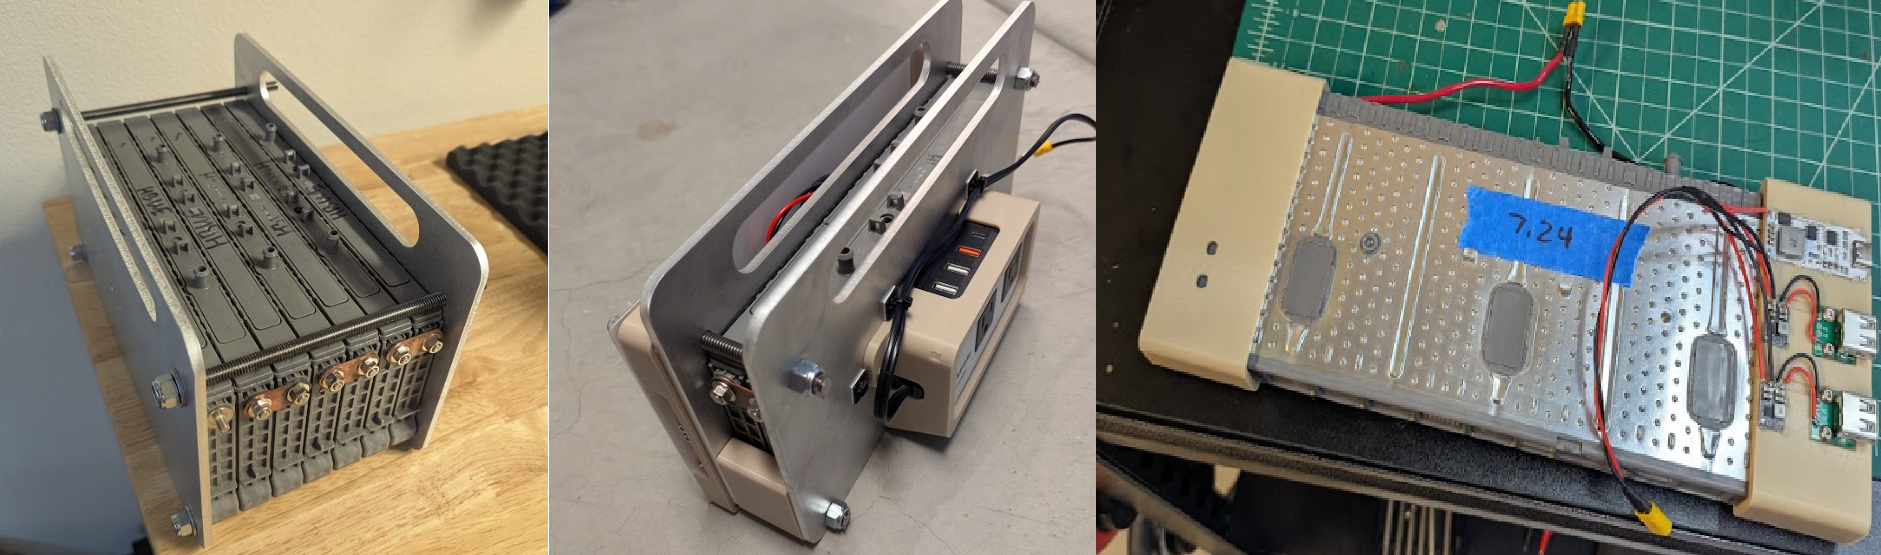
One neat thing about the sketchy NiMH USB-C charger boards is that I got to use equally sketchy Aliexpress 5V solar panels to charge them. I did this mostly because I happened to have some unused flexible panels that were approximately the size of the NiMH module. If you go down this route, make sure there's either a diode or a solar charger sitting between the panel and the charger board, otherwise the panel will actually discharge the battery at night (I had no clue this was a thing). I'm happy to report that this approach successfully stole free energy from the sun without initiating any thermal rapid-disassembly events.

Ultimately, I never figured out a form factor that I liked, and the inability to comfortable configure a second-life pack with modules in parallel led me to just return/resell these modules back to the Facebook Marketplace ecosystem, for which there's still surprisingly active demand.
Rewired Standalone Toyota RAV4 Hybrid Module
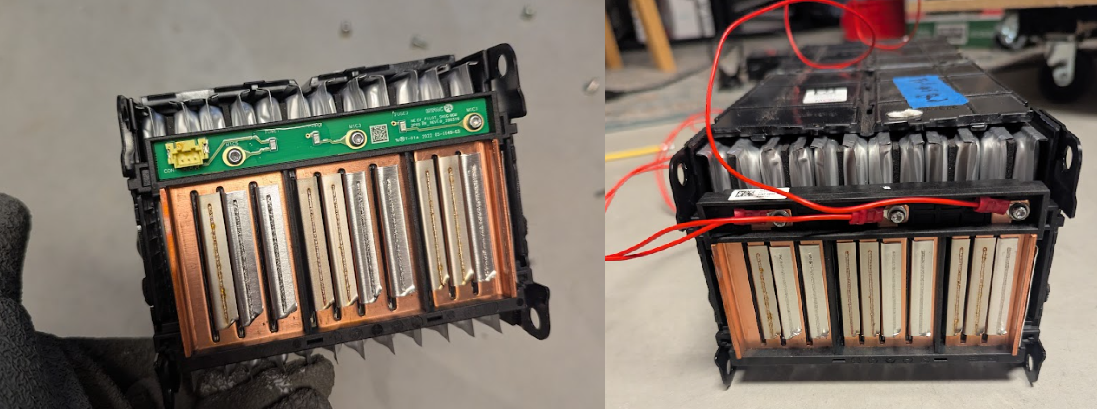
This will sound weird: I've taken apart several post-2020 Toyota RAV4 Hybrid battery packs, I really like the form factor and layout of their cells, and as I'll get into, I built multiple power bank packs with these cells, but I still can't find any online documentation on these cells whatsoever. I think it's because most RAV4 Hybrids still use the NiMH cell chemistry, and the newest RAV4's are predominantly plug-in hybrids (PHEV), which use a totally different and much larger battery pack. Assuming a total 1.6-1.9kWh pack capacity, 70 cells, and a reported pack voltage of 259V, each cell has a capacity between 6.1Ah and 7.3Ah. The size difference gives you a pretty good visualization of the advances in power density between the older NiMH chemistry and lithium-ion.
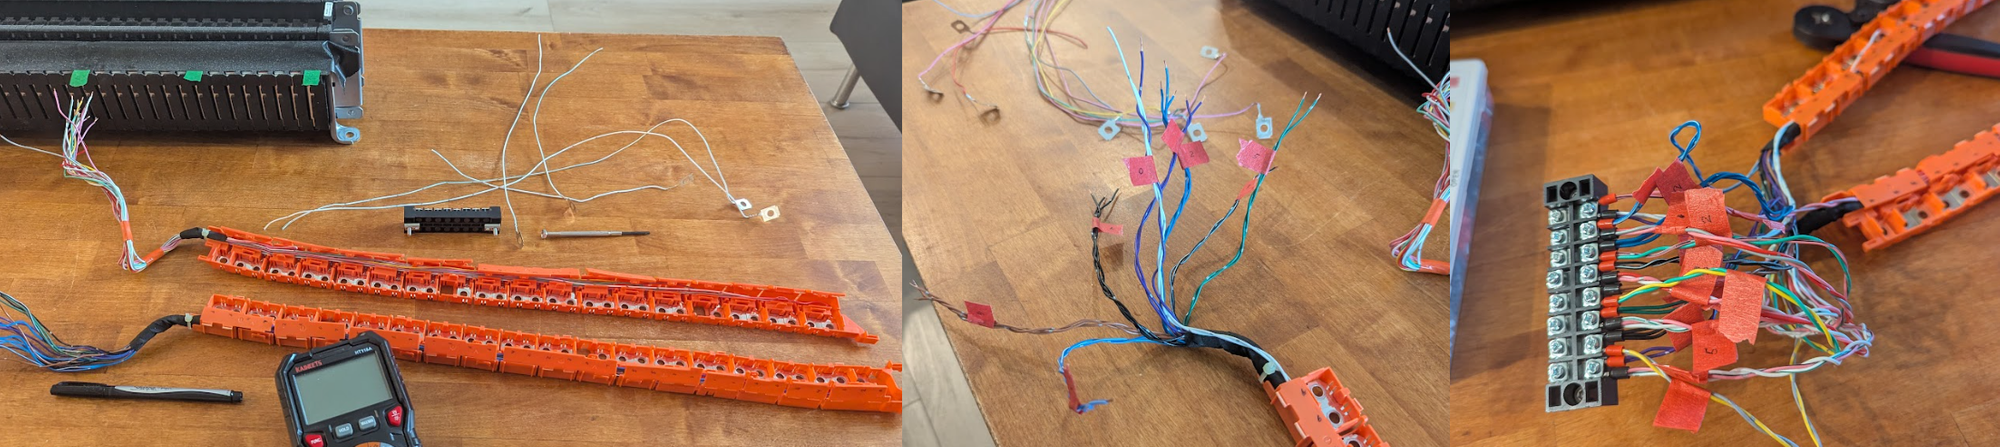
To get these RAV4 cells out, you have to cut apart the aluminum frame that's clamping them together, so I wanted to first see if I could just re-purpose and re-wire a module as-is, re-using as much of the existing wiring harness as possible. Each module has 35 cells, so that gave me the option of 5S (18.5V) or 7S (25.9V) configurations unless I just wanted to leave some unused cells hanging out. I decided to go with the 7S configuration so that I could ideally use it for 24V devices somewhat safely. It's still an atypical voltage range, but it seemed more useful than 5S.
Rewiring the module from 35S1P to 7S5P was a little hairy. I removed all the jumper busbars between adjacent cells and then reinstalled them such that it was effectively 5 sets of 7S1P groupings. You can't actually do 7 sets of 1S5P groupings because of the way the terminals alternate to accommodate the original module layout. I probed, re-probed, and re-probed the existing harness endpoints to determine which wires should be soldered together. I used to have a burnt pair of wire cutters to remind what happens when I probe incorrectly and accidentally short the wrong balance leads. For charge balancing/monitoring, I used a JKBMS Smart BMS board with bluetooth, and the final output was wired to a beefy XT90 connector. This particular BMS had a separate on-off switch, so I didn't bother wiring a main battery switch, but given the awkward size of this thing, I'd probably only use this power a small, yet-to-be-designed, robotic cart of some sort in the future.
Small Case Powerbank from PHEV RAV4 Cells
For this power bank, I shoved a 3S2P configuration into a gun case from Harbor Freight, along with a 400W inverter. Unlike the NiMH case, 3S lithium-ion configurations pair pretty well with 12V subsystems without inadvertently triggering any low/high-voltage alarms. The case was sized very conveniently for the RAV4 cells, allowing me to reuse the standard plastic separators from the original module, which then meant I could re-use the busbars as well. I used a dremel to create access ports for both the inverter and the voltage indicator. The extra printed bracket around the inverter was meant to fill the remaining gap and keep some compressive force on the cells to prevent swelling. There just wasn't enough space for a 3S3P configuration, but this little cases provides about 150 Wh.
This pack used a much simpler 3S BMS board (HX-3S-FL25A) that is typically used for powered handheld drills. Despite the specs saying that the standby current draw is just 30uA, I found that leaving the battery switch on (but without anything other loads attached) drained the battery within about a week. Leaving the battery disconnected maintains the battery capacity as expected. Part of me wonders if that's an indication of poor cell health or a faulty BMS board, but at this point, I really don't know.
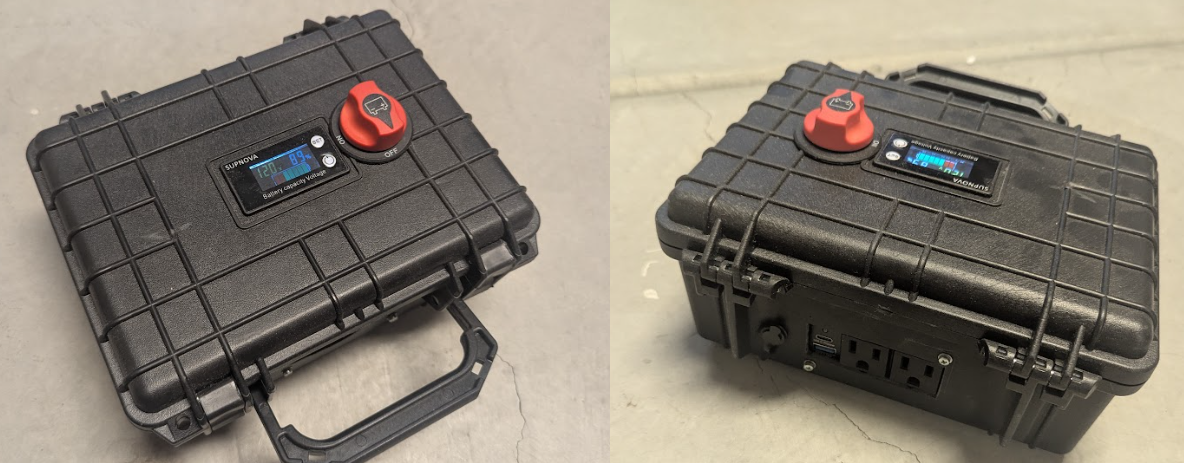
Medium Case Powerbank from PHEV RAV4 Cells
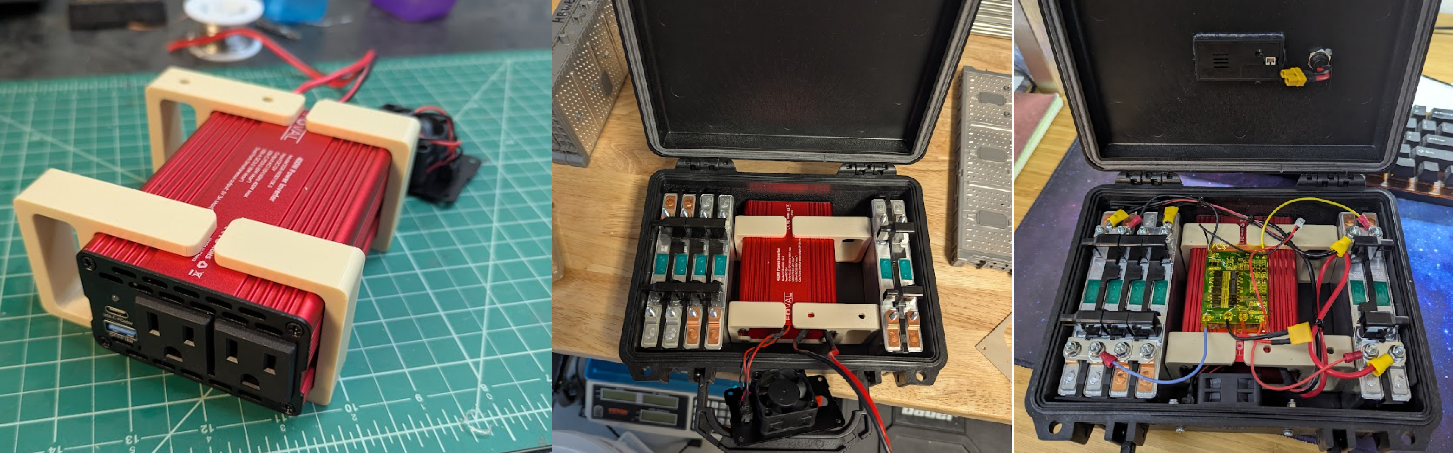
I lucked out again with this Bauer container box from Harbor Freight when I tried building a bigger version of the previous pack. The RAV4 cells also fit really nicely inside, and I was able to pack in a 6S6P (36 total cells, 22.2V nominal) configuration with a 600W inverter. Similar to the last build, I sized some 3d-printed adapters and spacers to keep everything as tightly constrained against the sides of the box as I could. I also tried to be less ass at wiring and tried to route the cabling around the hinge so that you can actually open the box all the way without disconnecting anything if you needed to do maintenance.
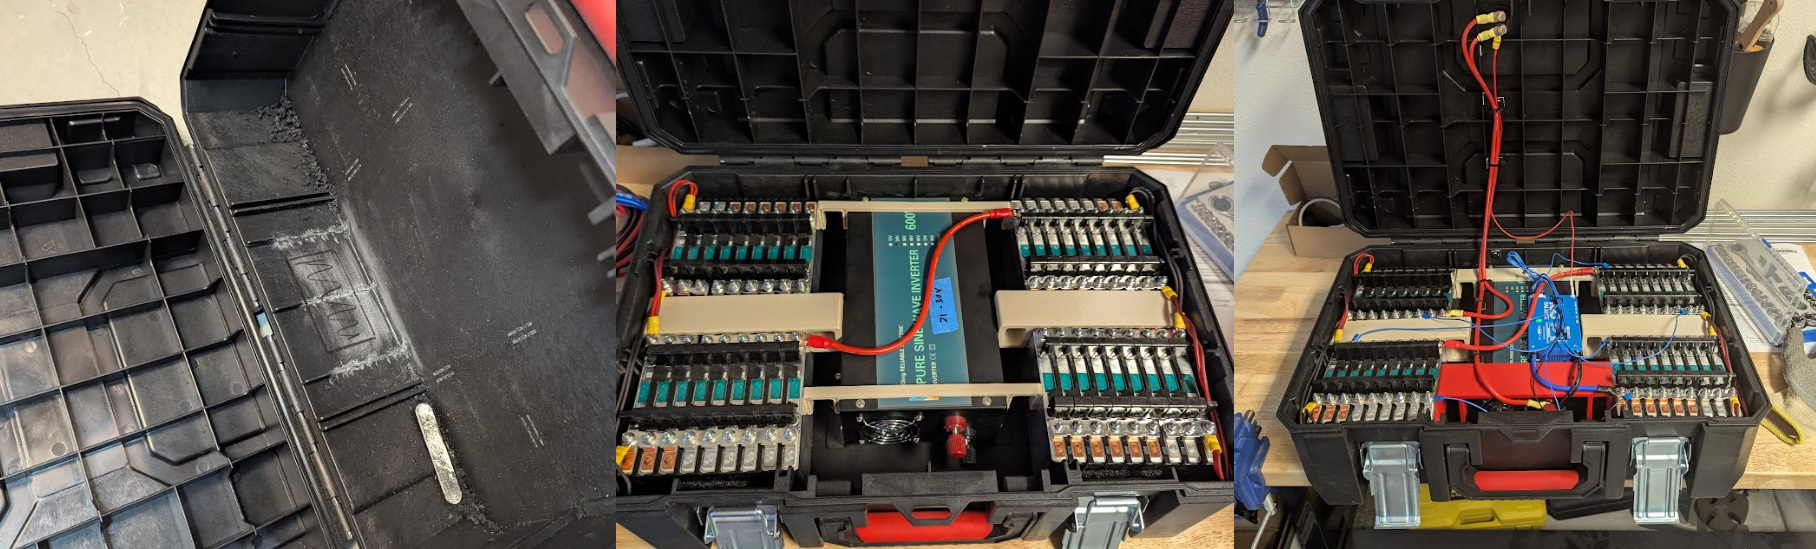
For electronics, I used the same power switch as the smaller power bank but opted for a 4-8s Daly BMS with bluetooth. The hardware was way sleeker and nicer compared to JKBMS but the app was a nightmare to use. I did however appreciate that all of these fancier BMS's have built-in temperature sensors to catch thermal runaway events. With a theoretical capacity of 850-ish Wh, this pack is more comparable to a typical camping power station from Ecoflow or Anker, just jankier and less reliable and with fewer ports, but I guess we're getting somewhere.
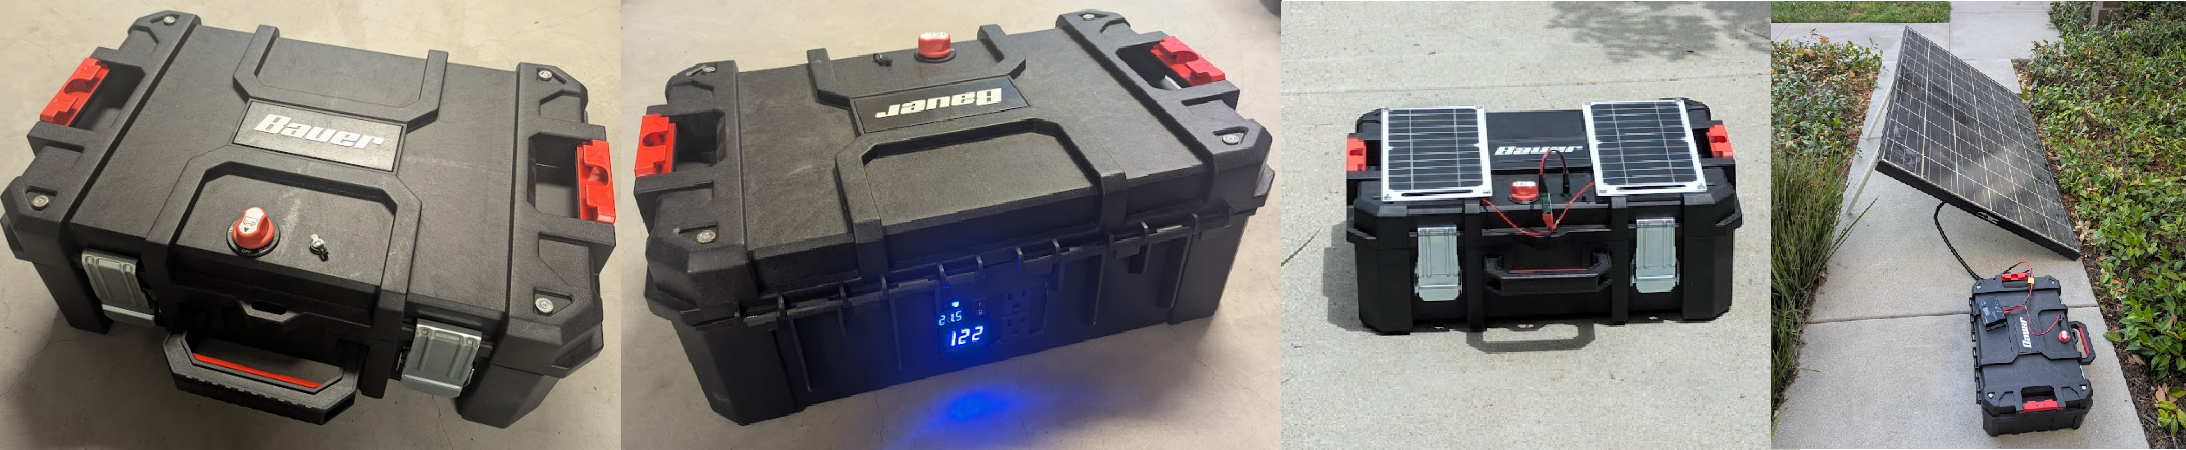
While I was building this, nearby folks listed some used solar panels for resale on Marketplace, so I of course fell down that rabbit hole for a bit too. I already had some questionable 5V Aliexpress panels, so I hooked those up first to a USBC-to-6S charger board (kind of crazy that these exist) and got a whopping 2W charge rate during sunny conditions after all the efficiency losses. The used solar panel reportedly was rated for 285W, and in combination with a PWM Renogy solar charger, I achieved a much more useful 160W charging rate. Unfortunately, I didn't keep that solar panel much longer, as I live in a condo and couldn't really justify the space to keep it around.
Rewired Hyundai Ioniq Powerbank
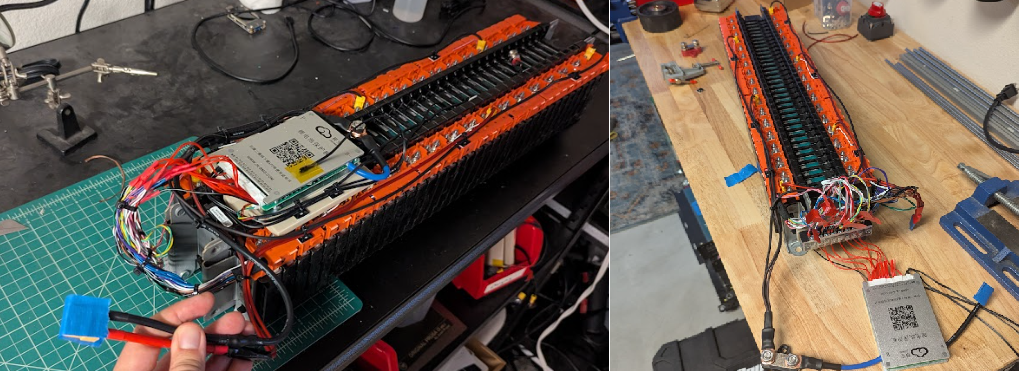
At my last startup, I really liked the Ioniq pack design, as well as their modules' prospects for reuse. The Koreans, much like the Germans, really know how to package their cells and design for modularity. No messy foam or trapped cells. All cable harnessing are neatly routed, and in this case, the 6s2p modules nestle nicely for both tight packaging and improved structure rigidity. Assuming 72.6kWh for the whole pack, running at 800-ishV, each module should have 2.42-ish kWh, which is pretty fantastic.
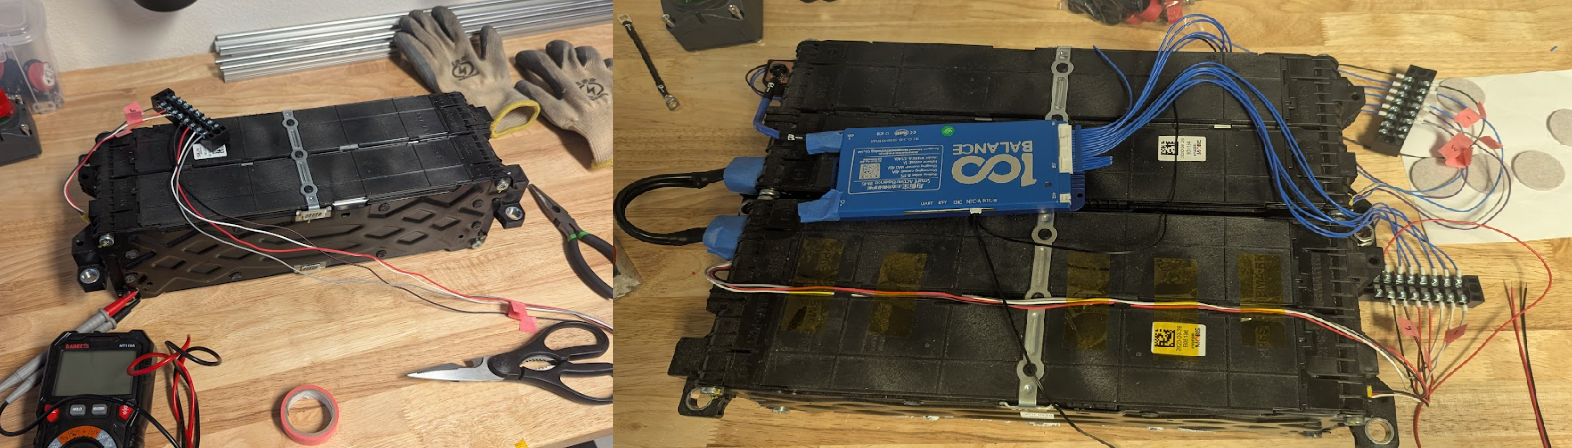
I remember being a little fast and haphazard when I disassembled the pack, so it wasn't too big of a surprise when one of the balance leads wasn't reading the voltage it should. Luckily, the modules are fairly easy to unscrew, and after I popped out the ends and did some probing, I found that one of the fuses had blown. Luckily, I conveniently still had access to screw terminals leading to each pouch, so I just replaced the breakout board with direct wire connections. Most of the pouches I've seen are spot-welded to the terminals, so unless you can work directly with the existing terminals or have your own spot-welder, you may be shit out of luck if it's damaged.
The test/build procedure was similar to that for the RAV4 module: I used some terminal blocks temporarily so that I could probe the balance wire pinout and double-check the BMS (another Daly BMS) operation. The end-result was a 12s2p configuration that I'd like combine with some 12V and 24V buck converters to power a future rover project.
A Solar and Inverter Side Quest
Like I mentioned, I started haphazardly trying to add solar as I was throwing together these packs, because hey, who doesn't like free energy? I don't have any novel insights to add (plenty of other folks have done a much better job of that), but there were some (now-obvious) things I learned along the way:
- You really need fairly large solar panels if you want to do any meaningful charging. Smaller portable panels are limited in voltage/power, will probably break far more easily, and have questionable specs.
- Whatever panel size you think you need for your application, you'll definitely need larger. Think about the panel size that you see in warehouse parking lots just to power a night light and security camera.
- Direct power output from a solar panel is very irregular, and an errant shadow is usually just waiting around the corner to disappoint you
- Cheaper PWM solar chargers ([1][2]) will tank the performance of your already cheap solar panels, and they're typically made for just a limited set (often just 12V and 24V) of pack voltages. However, it's hard to justify the cost of a more legit MPPT solar charger for DIY power banks. Apparently a DC-DC converter can sometimes be a more cost-effective choice.
- Solar panels need to output more than your pack's max voltage, and ideally its minimum VoC should exceed what you need to charge the pack. A "12V" solar panel would produce voltages in the 15-17V range before it gets regulated by a solar charger.
- Typical AC inverters also only work for limited voltage ranges (usually around 12V, 24V, and 48V), so don't expect a generic inverter work for any battery pack voltage you configure.
- Microinverters (well, with maybe one or two very expensive exceptions) don't work standalone, disconnected from the grid. They are not magical combo solar charger and inverter in one.
Thoughts and Notes on Economics of 2nd-life Packs
These thoughts are my own and don't reflect those of my former employer or collaborators or VCs
tldr; Aside from some grid storage cases, I don't see where second-life packs are viable unless OEMs drastically change how they design their packs
The original promise of second-life batteries relied on a couple of factors holding true:
- EV packs unsuitable for driving could still be useful for storage applications
- An EV pack may be damaged or bad as a whole but individual cells/modules could still be functional
- Batteries (due largely to their constituent materials) retain enough high value such that the cost of dismantling, testing, and refurbishing them remains sufficiently lower than producing a new battery. (I'd argue that the funding of behemoths like Redwood Materials gave this hypothesis credibility)
On the materials-side, I think the introduction of new lower-cost chemistries like LFP (LiFePO) was the primary killer of second-life ambitions. I'm going to ignore the effects of environmental policy shifts and changes in subsidies, since the political climate has been less than stable or rational the past decade, I have no clue how that game is played or measured, and I personally don't think those things should be considered when evaluating a market's viability. As with cars, there's not really any motivation for a customer to buy a used model when a brand new model performs better and isn't all that much more expensive. However, even if LFP batteries never gained traction, the second-life concept had a lot of challenges:
- Measuring battery cell health is not trivial. You generally want to run a cell through full discharge/charge cycles to determine its true capacity and performance. That typically gets done at the factory level during production. Reselling a literal lemon would open up a whole can of liability worms. I had and still have no clue as to the health of the cells I used in my DIY packs
- The EV pack form factor and configuration aren't great for other applications. The voltage (up to 800V nowadays) is much higher than what is safe or useful for grid storage applications, and the packing isn't as dense as it could be. As I showed in the RAV4 module example, you may need to do a good amount of rewiring to convert the module to a more conventional voltage range, assuming you want to keep the existing module structure and not break it down further. However, the more you break down the pack to cells, the less you can re-use the other components like harnessing and busbars and enclosures.
- There are lots of different cell formats, so you can't easily mix and match across different EV packs. Most packs don't use a standard cell like the 18560 and even those that do have made their packs increasingly difficult to dismantle down to that level.
- The set of battery cells aren't the only components you'd need in a second-life battery pack. Any builder of second-life battery packs would also need to provide their own enclosure, BMS, harnessing, cooling (where necessary), connectors, etc.
- EV packs are heavy. Every problem has or is a logistics problem. The cost of shipping these packs (safely) can be substantial, both for the initial acquisition of the pack and then also for the shipping of the final product. Even if you're intent on re-packaging the cells, you'd still need to be responsible for shipping the weight of the rest of the original pack.
- Dismantling is hard, and while packs may be designed for assembly, no one cares all that much to design for disassembly. One thing more expensive than labor is skilled labor. As with obsolete electronics, it may very well be that shredding will end up being the preferred and most economical approach.
Successes in second-life battery storage have predominantly reused EV packs directly and without teardowns. This limits each battery storage solution to a specific model and requires someway to hack or bypass the existing pack BMS, but it also doesn't require the vendor to design/produce new auxiliary pack components. Still, this makes the most sense when the EOL packs are free or near-free, and also when they're still safe to run. Neither case should be presumed to be a common opportunity waiting to be had.